
- Introduction
- Report Readers
- Report Authors
- DevOps
-
Developers
- Quick Start
- Breaking Changes
- ActiveReports Version Compatibility and Migration
- License ActiveReports
- Configure ActiveReports Using Code
- Work with Reports using Code
- Report Parts
- Create Designer and Viewer Applications
- Extensibility in ActiveReports
- External Customizations in ActiveReports
- Export Reports
- Print Reports
- Plugins Development
- Samples
- Troubleshooting
PDF Export
PDF, or portable document format, opens in the Adobe Reader. The PDF export filter has a number of useful properties that allow you to control your output. You can set the properties either in code using the PDFExport object after adding reference to MESCIUS.ActiveReports.Export.Pdf package in your project
type=note
Note: PDF export and font linking features are only available in the Professional Edition of ActiveReports.
PDF Export Properties
| Property | Valid Values | Description |
|---|---|---|
| ConvertMetaToPng | True or False (default) | Set to True to change any Windows metafile images to PNG format to keep the file size down. If the report has no metafiles, this setting is ignored. |
| ExportBookmarks | True (default) or False | Set to True to generate bookmarks from the bookmarks in the report. If the report has no bookmarks, this setting is ignored. To control how the exported bookmarks are displayed, use Options.DisplayMode detailed below. |
| FontFallback | String of font families | Set a comma-delimited string of font families to be used to lookup glyphs missing in the original font. |
| ImageInterpolation | None (default) or Auto | Specifies the images interpolation value. Allows to enable/disable image interpolation, when exporting the file to PDF. |
| ImageQuality | Lowest, Medium (default), or Highest | Set to Highest in combination with a high value in the ImageResolution property to yield the best printing results when converting Windows metafiles (.wmf). Set to Lowest to keep the file size down. If the report has no metafiles, this setting is ignored. |
| ImageResolution | 75 - 2400 dpi | Set to 75 dpi to save space, 150 dpi for normal screen viewing, and 300 dpi or higher for print quality. Use this property in combination with ImageQuality (highest) to yield the best results when the report contains metafiles or the Page.DrawPicture API is used. Neither property has any effect on other image types. |
| NeverEmbedFonts | A semicolon-delimited string of font names | List all of the fonts that you do not want to embed in the PDF file to keep the file size down. This can make a big difference if you use a lot of fonts in your reports. |
| Options | See below | Expand this property to see a group of sub properties. These settings control how the Adobe Reader displays the output PDF file when it is first opened. See the table below for details. |
| Pagination | True or False (default) | Gets or sets the value that indicates whether to use pagination in the exported PDF document. This property is only useful for Page/RDLX reports exports through RDF and does not affect a section report. |
| PrintPresets | See below | Returns an object allowing you to specify the print presets. |
| Security | See below | Expand this property to see a group of sub properties. These settings control encryption and permissions on the output PDF file. See the table below for details. |
| Version | Pdf11, Pdf12, Pdf13, Pdf14, Pdf15, Pdf16, Pdf17, Pdf20, PdfA1a, PdfA1b, PdfA2a, PdfA2b, PdfA2u, PdfA3a, PdfA3b, PdfA3u, and PdfUA1 | Sets the version of the PDF format the exported document is saved in. |
| Watermark | See below. For CrossPlatform compatibility mode only. | Expand this property to see a group of sub properties. These settings control whether a report is exported to PDF with a watermark on it. See the table below for details. |
PDF Export usage and limitations
Usage:
- Create printable reports whose formats do not change from machine to machine.
- Open in Adobe Reader.
- WYSWYG in both compatibility modes - a legacy GDI and a new CrossPlatform mode (section report).
Does not support:
- Multiple lines of vertical text is not supported in Page and RDLX reports (GDI compatibility mode).
- Transparent background-color in charts is not supported in the GDI compatibility mode if ConvertMetaToPng is set to True.
Options, Security, and Watermark
When you expand the Options, Security, or Watermark properties in the Properties window, the following sub properties are revealed.
PDF Options Properties
| Property | Valid Values | Description |
|---|---|---|
| Application | String | Set to the string value that you want to display in the Adobe Document Properties dialog, Description tab, Application field. |
| Author | String | Set to the string value that you want to display in the Adobe Document Properties dialog, Description tab, Author field. |
| CenterWindow | True or False (default) | Set to True to position the Adobe Reader window in the center of the screen when the document is first opened. |
| DisplayMode | None (default), Outlines, Thumbs, or FullScreen | Select how to display bookmarks when the document is first opened. * None (default) bookmarks are not displayed until opened by the user. * Outlines shows bookmarks in outline format. * Thumbs shows bookmarks as thumbnails. * FullScreen shows the document in full screen, and bookmarks are not displayed. |
| DisplayTitle | True or False (default) | Set to True to use the Title string entered in the Title property below. Otherwise, the file name is used. |
| FitWindow | True or False (default) | Set to True to expand the window to fit the size of the first displayed page. |
| HideMenubar | True or False (default) | Set to True to hide the menu in the Adobe Reader when the document is first opened. |
| HideToolbar | True or False (default) | Set to True to hide the toolbars in the Adobe Reader when the document is first opened. |
| HideWindowUi | True or False (default) | Set to True to hide the scrollbars and navigation controls in the Adobe Reader when the document is first opened, displaying only the document. |
| Keywords | String | Enter keywords to display in the Adobe Document Properties dialog, Description tab, Keywords field. |
| OnlyForPrint | True or False (default) | Set to indicate whether the PDF is only for print. |
| Subject | String | Enter a subject to display in the Adobe Document Properties dialog, Description tab, Subject field. |
| Title | String | Enter a title to display in the Adobe Document Properties dialog, Description tab, Title field. Set DisplayTitle to True to display this text in the title bar of the Adobe Reader when the document is opened. |
PDF Security Properties
| Property | Valid Values | Description |
|---|---|---|
| Encrypt | True or False (default) | Sets or returns a value indicating whether the document is encrypted. |
| OwnerPassword | String | Enter the string to use as a password that unlocks the document regardless of specified permissions. |
| Permissions | None, AllowPrint, AllowModifyContents, AllowCopy, AllowModifyAnnotations, AllowFillIn, AllowAccessibleReaders, or AllowAssembly | Combine multiple values by dropping down the selector and selecting the check boxes of any permissions you want to grant. By default, all of the permissions are granted. |
| UserPassword | String | Enter the string to use as a password that unlocks the document using the specified permissions. Leave this value blank to allow anyone to open the document using the specified permissions. |
PDF Watermark Properties (CrossPlatform Compatibility Mode only)
| Property | Valid Values | Description |
|---|---|---|
| Angle | String | Specify the degree of angle for the watermark text on the PDF document. Valid values range from 0 to 359, where 0 is horizontal, left to right. |
| Color | String | Select a color for the watermark text of the PDF document. |
| FontName | String | Specify the font of the PDF document watermark text. |
| FontSize | String | Specify the font size of the PDF document watermark text. |
| FontStyle | Regular, Bold, Italic, Underline, or Strikeout. | Select the font style of the PDF document watermark text. |
| PrintOnly | True or False (default) | Specify whether the watermark should appear on printed pages only. |
| Text | String | Enter text to be used as the watermark on the PDF document. |
PDF Print Presets Properties
ActiveReports allows you to preset the printing properties for PDF report exports using the PrintPresets class. This pre-populates the print settings in the Print dialog box. Please see Print Presets for more information.
type=note
Note: The print preset properties are only available with the Professional Edition license. An evaluation message is displayed when used with the Standard Edition license.
| Property | Description |
|---|---|
| PageScaling | Specify scaling for the printable area.You can select Default to shrink to the printable area, or you can select None for the actual size. |
| DuplexMode | Specify the duplex mode of the printer. For the best results with the duplex option, the selected printer should support duplex printing. You can choose from the following values, * Simplex: Prints on one side of the paper. This is the default value. * Duplex (Flip on long edge): Prints on both sides of the paper with paper flip on the long edge. * Duplex (Flip on short edge): Prints on both sides of the paper with paper flip on the short edge. |
| PaperSourceByPageSize | Determines the output tray based on PDF page size, rather than page setting options. This option is useful when printing PDFs with multiple page sizes, where different sized output trays are available. By default, this option is set to False. |
| PrintPageRange | Specify the range of page numbers as 1-3 or 1, 2, 3. |
| NumberOfCopies | Specify the number of copies to print. You can select any number of copies from 2 to 5, or select Default to specify a single copy. |
type=note
Note: These properties are available in PDF version 1.7 or higher. The PageScaling property is supported in PDF version 1.6.
Metadata in PDFs
Adding Metadata

Metadata such as keywords, descriptions are used by the search engines to narrow down the searches. You can add a number of predefined accessors, such as title, contributors, creators, copyright, description, etc. using AdditionalMetadata property. The allowed namespaces are:
Dim sectionReport As GrapeCity.ActiveReports.SectionReport = New GrapeCity.ActiveReports.SectionReport()
Dim xtr As XmlReader = XmlReader.Create(Application.StartupPath & "\SectionReport1.rpx")
sectionReport.LoadLayout(xtr)
sectionReport.Run()
Dim pdfExport As GrapeCity.ActiveReports.Export.Pdf.Section.PdfExport = New GrapeCity.ActiveReports.Export.Pdf.Section.PdfExport()
Dim metadata1 = New AdditionalMetadataInfo With {
    .[Namespace] = AdditionalMetadataNamespace.PurlOrg, ' Dublin Core Properties
    .Key = "title",
    .Value = "Invoice"
}
pdfExport.Options.AdditionalMetadata.Add(metadata1)
pdfExport.Export(sectionReport.Document, Application.StartupPath & "\MyPDF.pdf")
GrapeCity.ActiveReports.SectionReport sectionReport = new GrapeCity.ActiveReports.SectionReport();
XmlReader xtr = XmlReader.Create(Application.StartupPath + "\\SectionReport1.rpx");
sectionReport.LoadLayout(xtr);
sectionReport.Run();
GrapeCity.ActiveReports.Export.Pdf.Section.PdfExport pdfExport = new GrapeCity.ActiveReports.Export.Pdf.Section.PdfExport();
// Add meta data
var metadata1 = new AdditionalMetadataInfo
{
    Namespace = AdditionalMetadataNamespace.PurlOrg, //Dublin Core Properties
    Key = "title",
    Value = "Invoice"
 };

pdfExport.Options.AdditionalMetadata.Add(metadata1);
pdfExport.Export(sectionReport.Document, Application.StartupPath + "\\MyPDF.pdf");
Adding Attachment
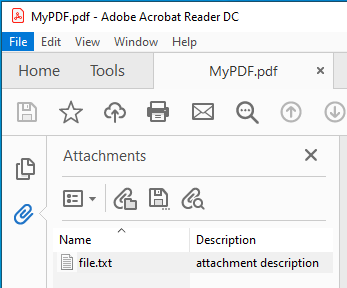
You can include an attachment as metadata (such as invoices) to exported PDFs using Attachments property. This property allows to attach files such as a .xml or a .txt file in PDF. Below is example to export Section reports to PDF and attach a file to the exported PDF.
Dim sectionReport As GrapeCity.ActiveReports.SectionReport = New GrapeCity.ActiveReports.SectionReport()
Dim xtr As XmlReader = XmlReader.Create(Application.StartupPath + _, SectionReport1.rpx)
sectionReport.LoadLayout(xtr)
sectionReport.Run()
Dim pdfExport As GrapeCity.ActiveReports.Export.Pdf.Section.PdfExport = New GrapeCity.ActiveReports.Export.Pdf.Section.PdfExport()
Dim attachment = New GrapeCity.ActiveReports.Export.Pdf.AttachmentInfo With {
    .Name = "file.txt",
    .Content = System.IO.File.ReadAllBytes("D:\Reports\file.txt"),
    .Description = "attachment description"
}
pdfExport.Options.Attachments.Add(attachment)
pdfExport.Export(sectionReport.Document, Application.StartupPath & "\MyPDF.pdf")
GrapeCity.ActiveReports.SectionReport sectionReport = new GrapeCity.ActiveReports.SectionReport();
XmlReader xtr = XmlReader.Create(Application.StartupPath + \\SectionReport1.rpx);
sectionReport.LoadLayout(xtr);
sectionReport.Run();
GrapeCity.ActiveReports.Export.Pdf.Section.PdfExport pdfExport = new GrapeCity.ActiveReports.Export.Pdf.Section.PdfExport();
// Add attachment
var attachment = new GrapeCity.ActiveReports.Export.Pdf.AttachmentInfo
    {
          Name = "file.txt",
          Content = System.IO.File.ReadAllBytes(@"D:\Reports\file.txt"),
          Description = "attachment description" //optional
    };
pdfExport.Options.Attachments.Add(attachment);
pdfExport.Export(sectionReport.Document, Application.StartupPath + "\\MyPDF.pdf");
Open the exported PDF and you should see the attachment. Check the left sidebar in Adobe Acrobat Reader DC.
type=note
Note: Metadata in PDFs is part of the Professional Edition. It is supported with the PDF version PDF/A-3b (or higher).
PDF/A Support Limitations
- The NeverEmbedFonts property is ignored, so all fonts of a report are embedded into the PDF document.
- The Security.Encrypt property is ignored and the PDF export behaves as if this property is always set to False.
- The OnlyForPrint property is ignored and the PDF export behaves as if this property is always set to False.
- Transparent images lose their transparency when exported to PDF/A-1.
- External hyperlinks are exported as plain text.
Export Report using PDF Export Filter
Use the following steps to export reports through PDF export filters.
Create a new or open an existing Windows Forms App (.NET Framework or .NET) in Visual Studio project.
Go to the Project Explorer, right-click the project and select Add > New Item.
Select ActiveReports 19 Standalone Report > Add and choose Section report type, and then click Finish.
The xml-based Section report (report.rpx) is added.Add a reference to MESCIUS.ActiveReports.Export.Pdf package in the project. See Manage ActiveReports Dependencies for more information.
In your project's Bin>Debug folder, place the report.rpx (Section Report).
On the Form.cs or Form.vb, double-click the title bar to create the Form_Load event.
In Form_Load event, add the following code to export Section Reports .
' Create a Section report.

Dim rpt As New GrapeCity.ActiveReports.SectionReport()
' For the code to work, report.rpx must be placed in the bin\debug folder of your project.
Dim xtr As New System.Xml.XmlTextReader(Application.StartupPath + "\report.rpx")
rpt.LoadLayout(xtr)
rpt.Run()

' Export the report in HTML format.
Dim PdfExport1 As New GrapeCity.ActiveReports.Export.Pdf.Section.PdfExport()
PdfExport1.Export(rpt.Document, Application.StartupPath + "\PDFExpt.pdf")
// Create a Section Report
GrapeCity.ActiveReports.SectionReport rpt = new GrapeCity.ActiveReports.SectionReport();

// For the code to work, report.rpx must be placed in the bin\debug folder of your project.
System.Xml.XmlTextReader xtr = new System.Xml.XmlTextReader(Application.StartupPath + "\\report.rpx");
rpt.LoadLayout(xtr);
rpt.Run();

// Export the report in PDF format.
GrapeCity.ActiveReports.Export.Pdf.Section.PdfExport PdfExport1 = new GrapeCity.ActiveReports.Export.Pdf.Section.PdfExport();
PdfExport1.Export(rpt.Document, Application.StartupPath + "\\PDFExpt.pdf");